Welcome to Wishflip, you have discovered the most affordable way to rapidly develop a website or eCommerce store. Our rapid solution is a cloud builder that boasts an incredibly simple to use intuitive drag and drop website builder that’s made for almost anyone to use even if it’s your first time building.
Now that you have acquired your website, let’s take a look at what’s important to note and where to get started with developing your new website. Herewith below a content list of what’s covered in the welcome post to new Wishflip users.
Content List:
1. What is Your Intention
- When you start considering the options you have to develop your website or your client’s website, be it for your business website or a personal blog, you have an intention. This intention is what will direct your choice in deciding which path to choose.
- Here are a few options you have to choose from to help make your decision process simpler:
- You create your own website with your prior knowledge, using the StableWish Plan you can rapidly spin up a website with Wishflip and start developing within seconds. This is an isolated path where you will drive the web design process from staging to live production. This option costs just $2.99 Per Month.
- You can learn how to create a website from scratch using the Exodus Plan for just $49 Per Month. A Wishflip cloud engineer will take you through the web development process and assist you in getting your website off the ground. You will have a certified Wishflip Engineer walk you through everything.
- You could have our cloud engineers develop your website or your client’s website for you using the Voyage Plan for just $29 Per Month and a once-off payment of $79.
Now that you have options you may choose whats best for you, no matter the path you choose we ensure you will experience the most user-friendly approach to professional web development.
2. Getting Started
To get started you will be exploring the various options your website back office has to offer you, once you are familiar with the majority of the options you will be exploring the front end of your website, this is what your clients or users will see when they visit your website. The following step will be to see how the back office settings change what users see on the front end of your website.
First things first, we need to configure all your basic settings so that you kickstart your project on the right foot, here is what we suggest noting right from the start.
What is my very first step?
If you purchased the Exodus, Voyager or Triumph plan please create a ticket here using our support platform, signup, create an account and create your first ticket. One of our engineers will respond to your ticket and get you started. It’s more than likely our Engineers will contact you before you create a ticket.
If you purchased the StableWish, UpWish or DreamWish plan please follow through below, we have loads to cover, this post is extensive however it will be worth your time adjusting to the norms of web development and web design.
If you have not purchased any plan with Wishflip just yet, take a look at the above links and follow the below steps to create a new website.
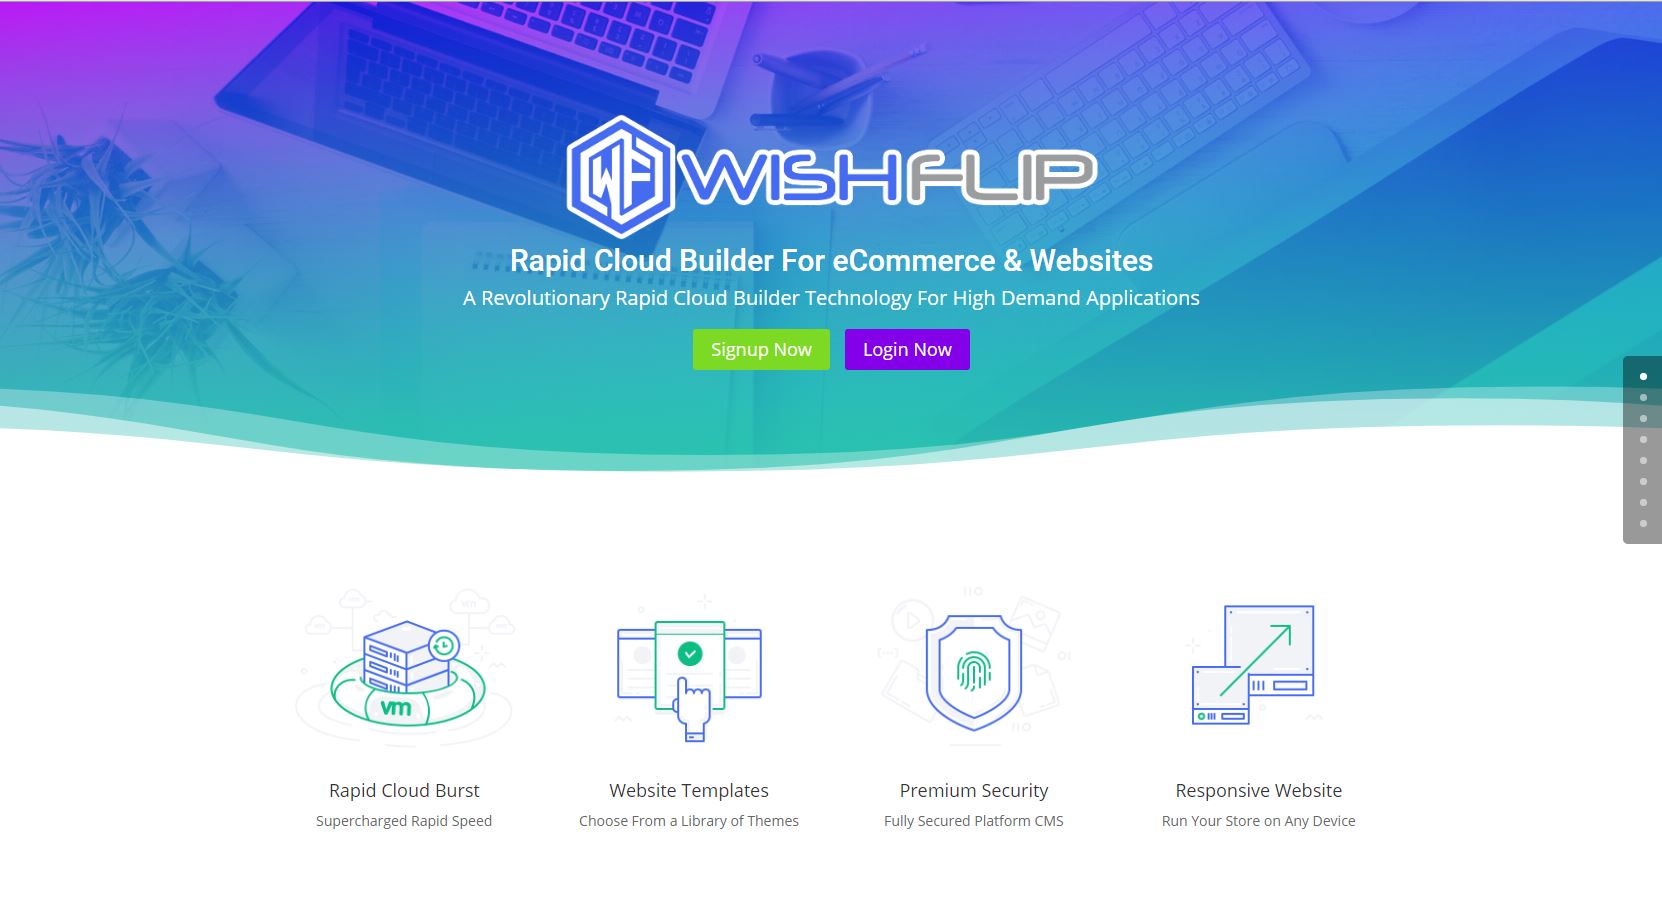
Step 1: Go to our Wishflip.com homepage and click the signup now button.
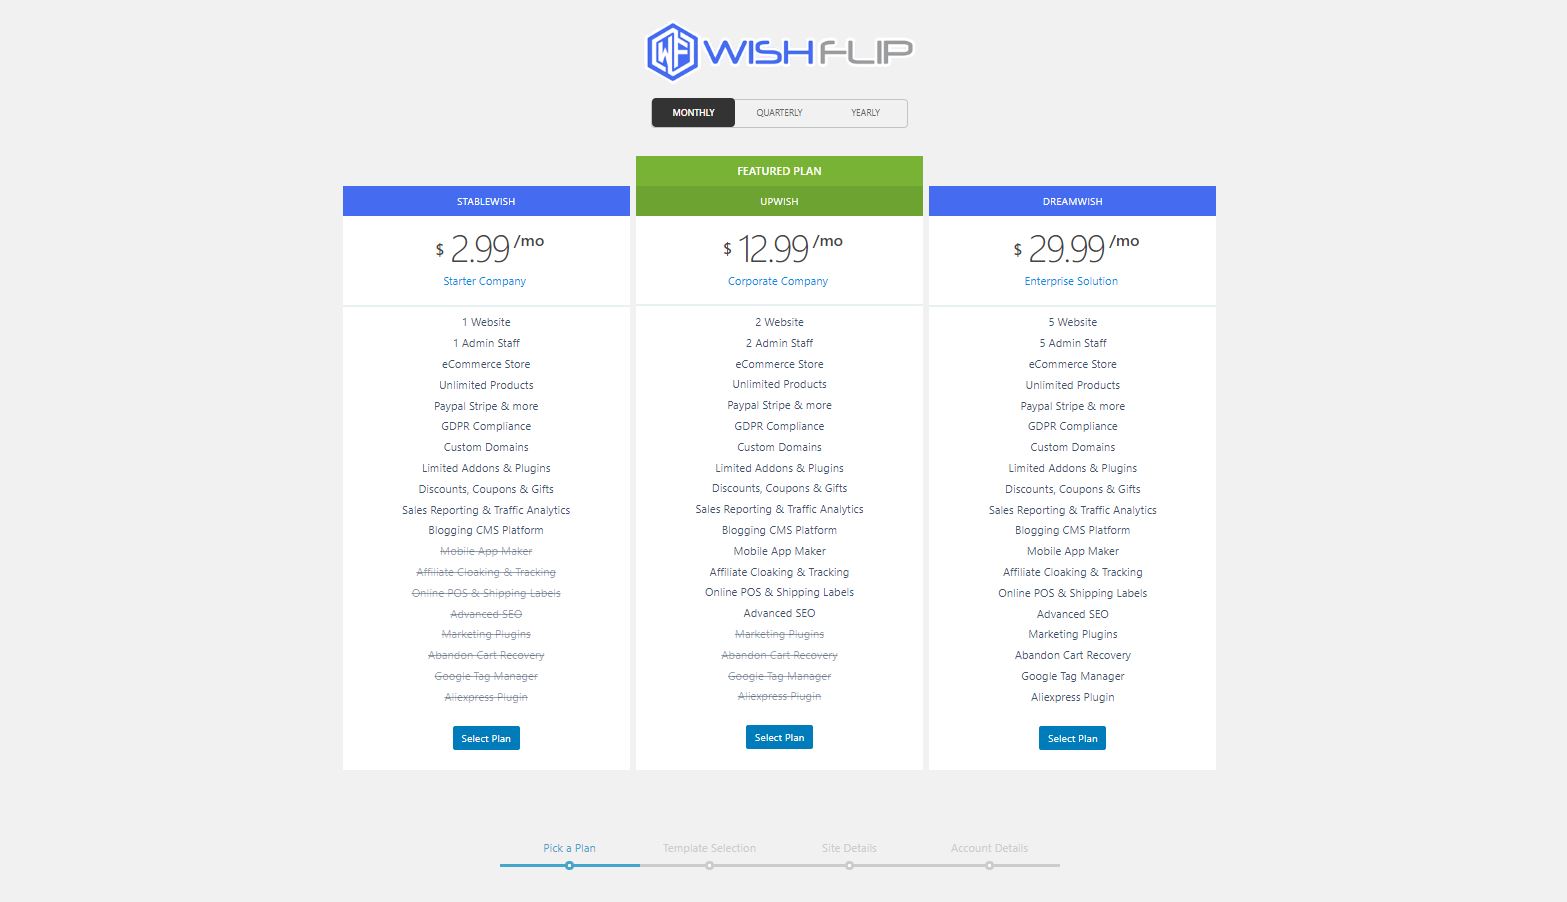
Step 2: Choose a Plan ( Note pricing may differ to what is seen in the image below )
Step 3: Select or View a Template that you would like to Rapidly Install
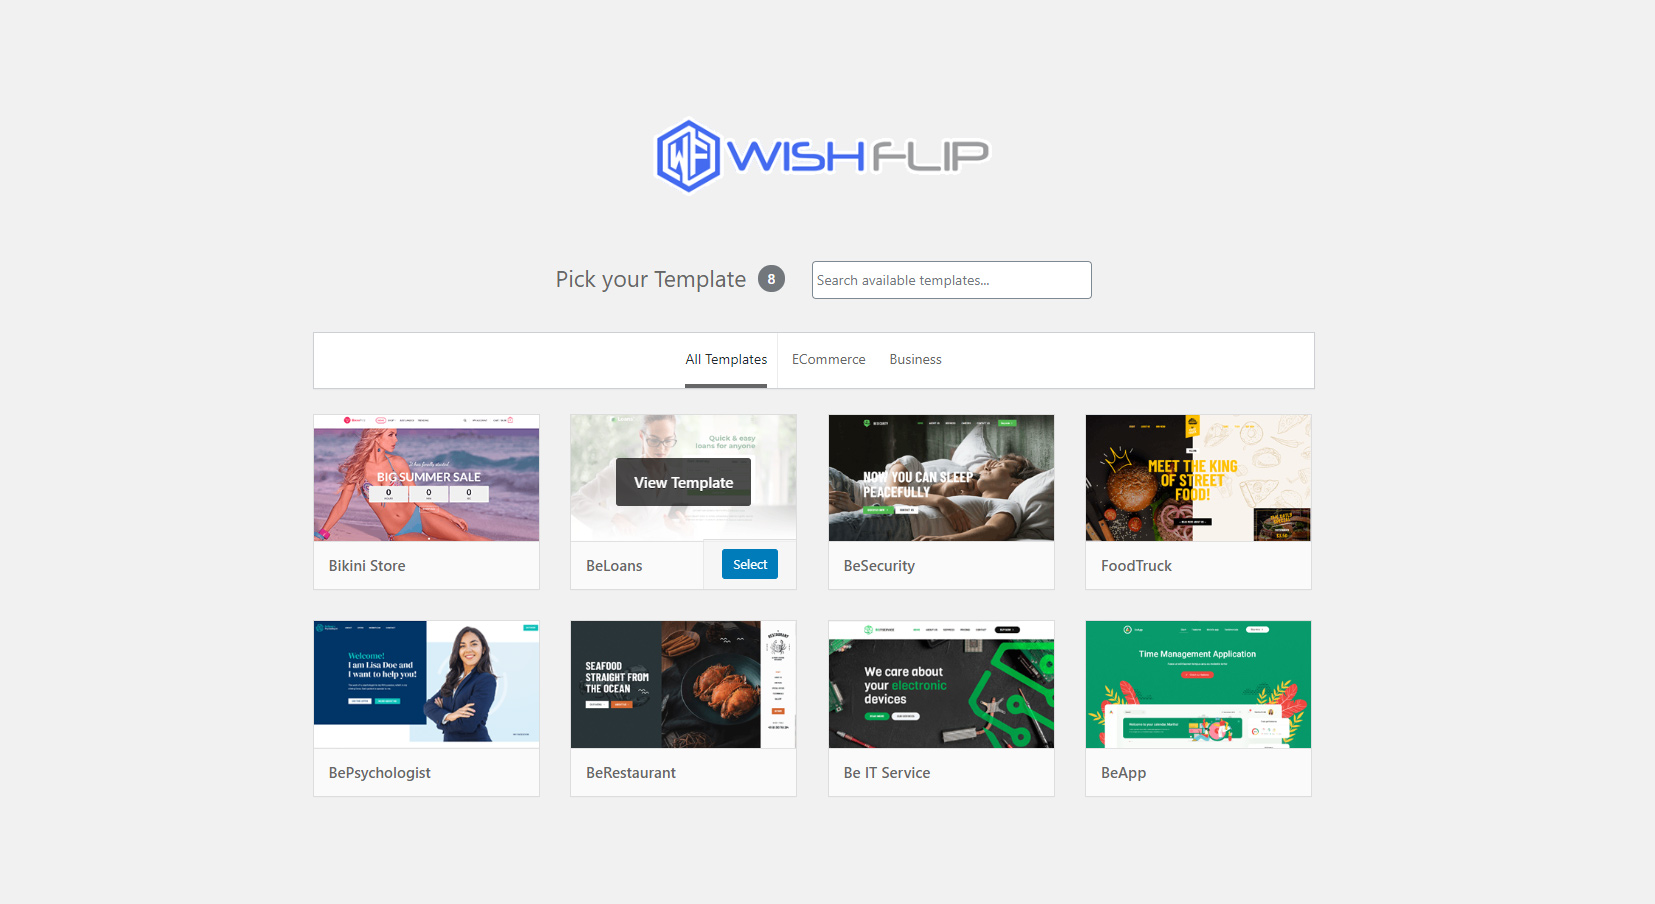
Step 4: Preview Template ( Optional Step If you Viewed Template in Step 3 )

Step 5: Register and create site details
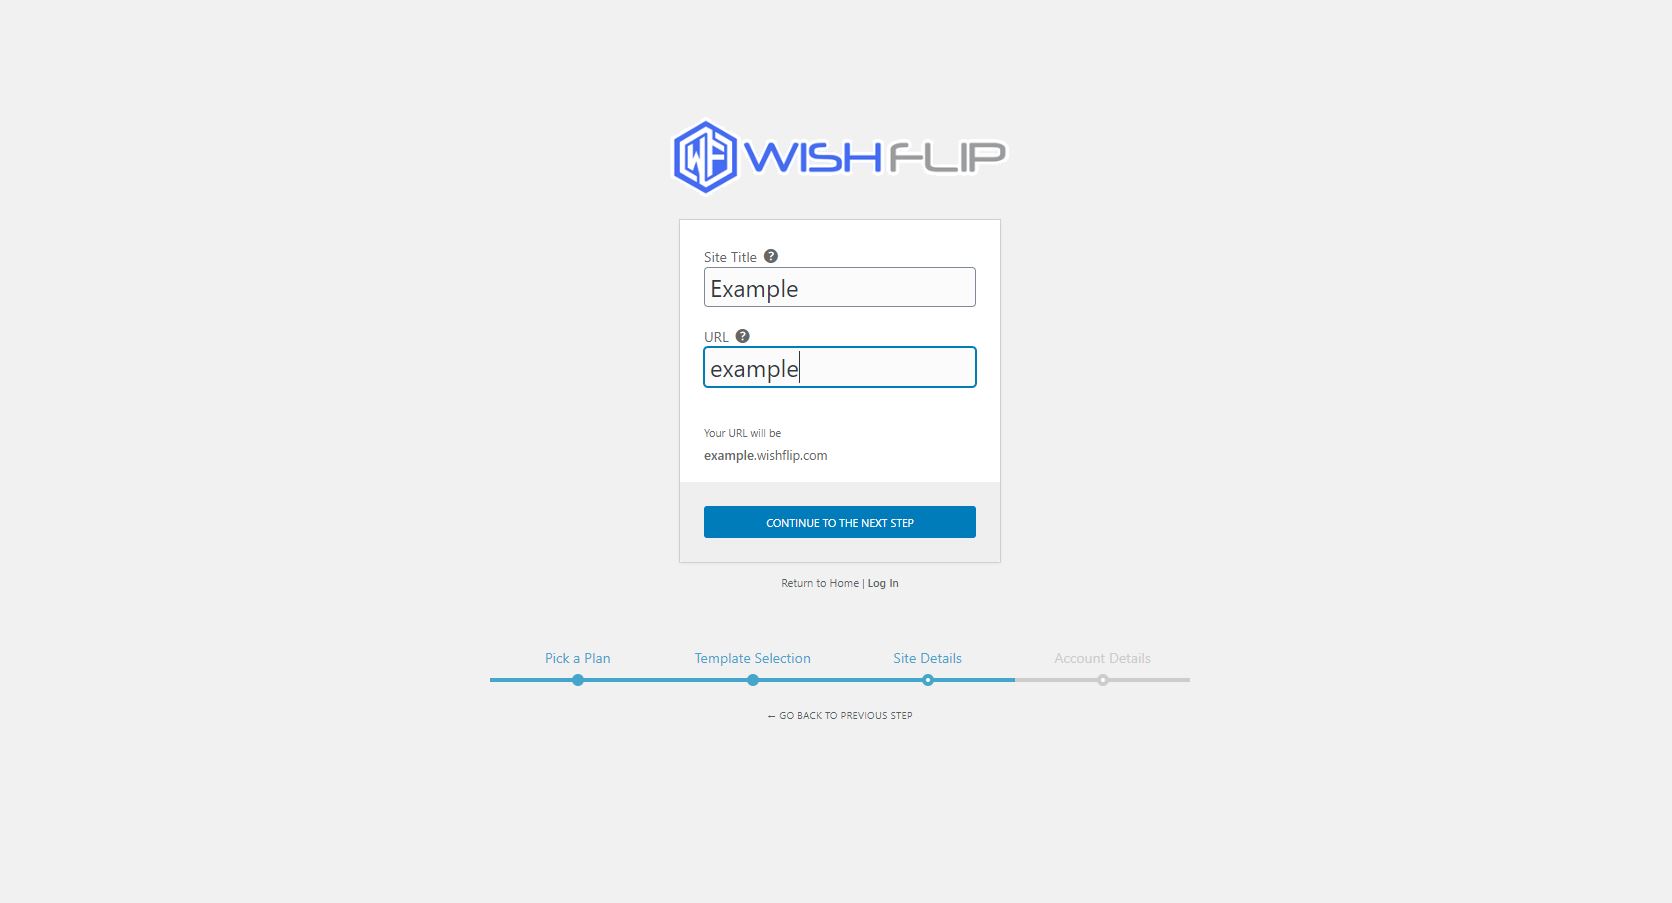
Step 6: Create user account details
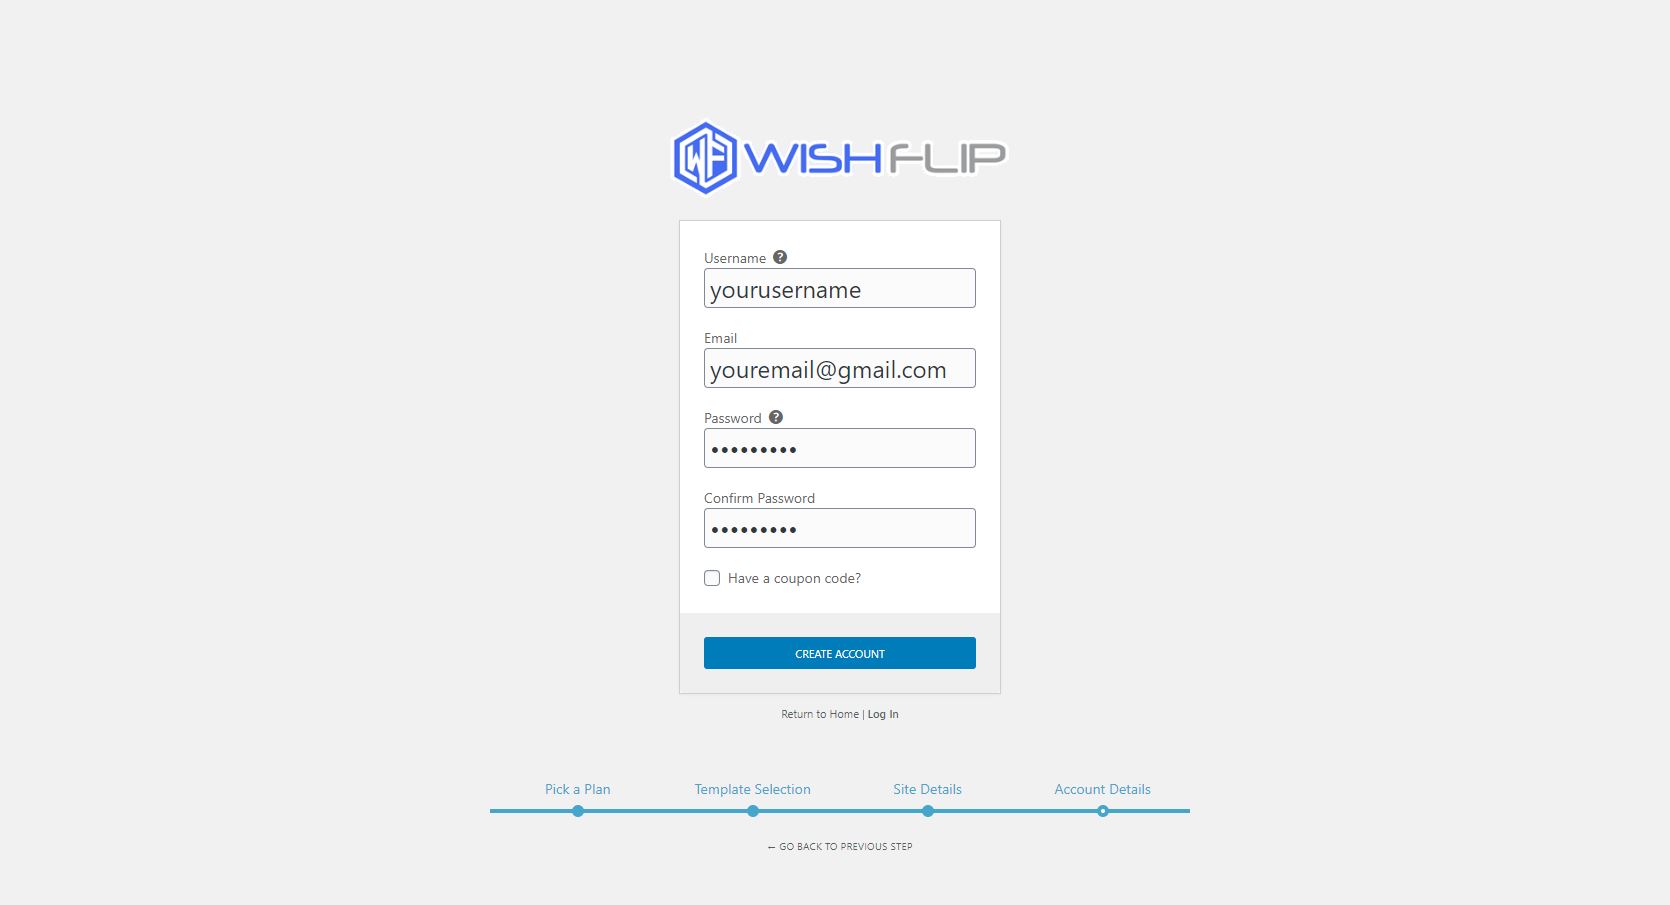
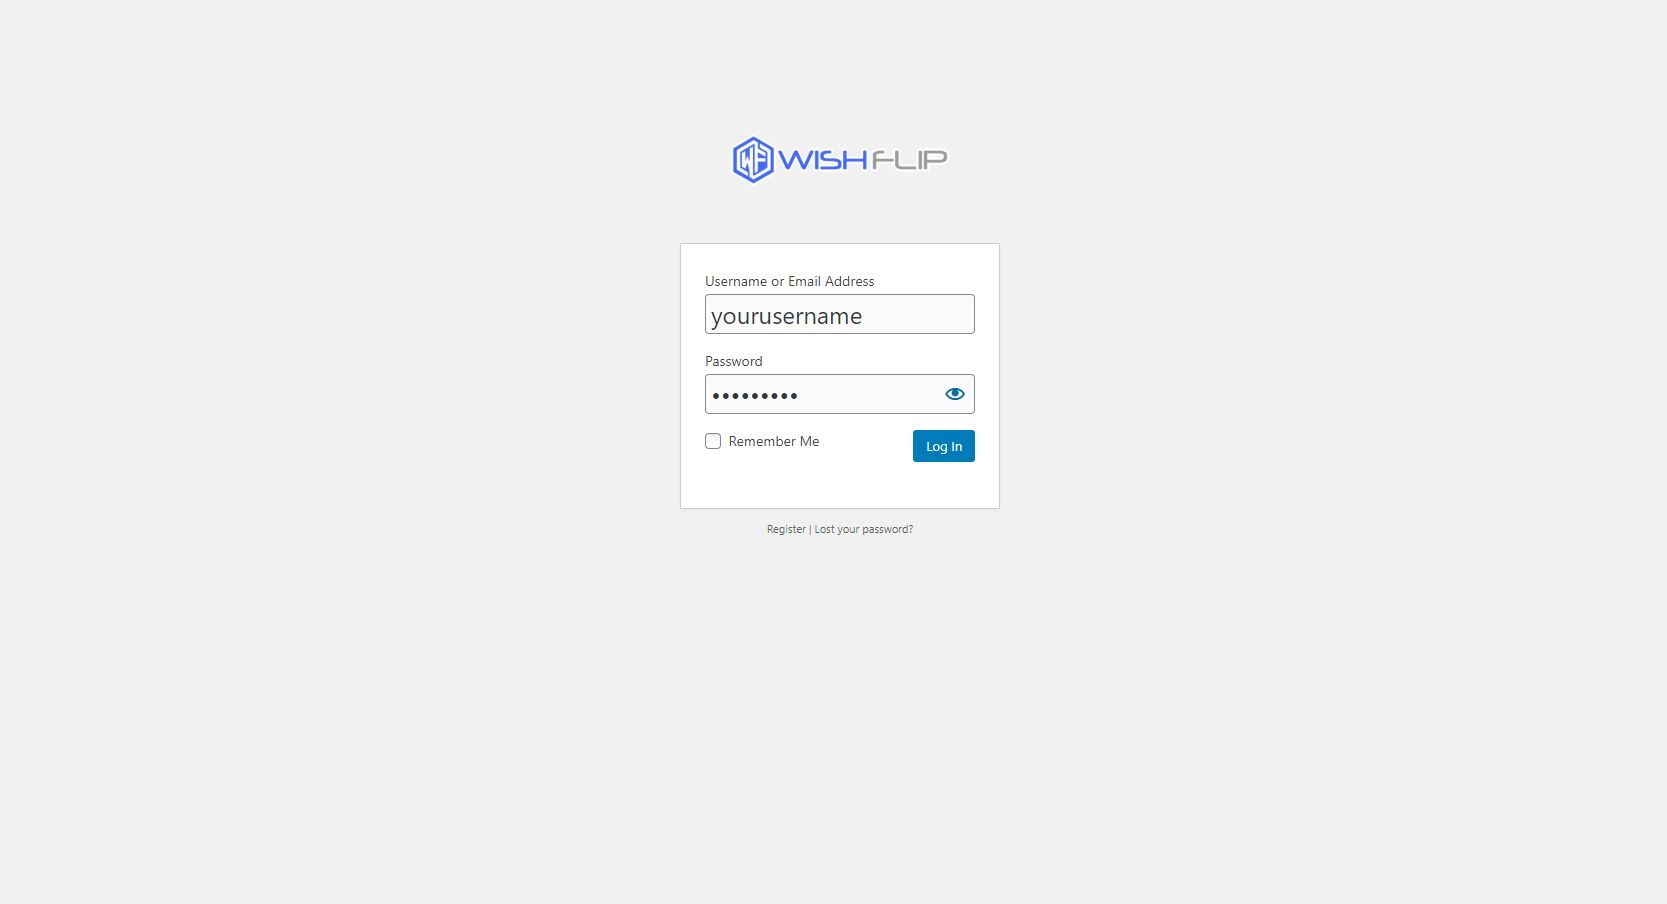
Step 7: Log in to your new website & make payment
3. Web Design Tools You Will Need
Becoming a Pro Web Developer means you will need an array for tools equivalent to your swiss army knife. Here are the best tools you will need to get started.
- Internet Browser:
- We Recommend Google Chrome as the best browser for web development
- You can, however, use Microsoft Edge, Safari or Mozilla Fox and other alternatives
- Graphics Art and illustration:
Any web developer will need a pixel perfect graphics art and illustration software to design and render their graphics or photography. Another approach would be to use creative commons license images from third party websites. No matter what you choose, your objective is to construct the most eye-catching relevant image for your product, blog post, article or featured image that will be used for your meta and schema for Google SERPs. More on this technical lingo later on in this article.
- The free graphic design software option would be canva.com , you can easily create a pixel-perfect web optimize image on canva.com or you could use one of their many already built templates. However, when designing a website you will need to design in Pixels and choosing the pixel size of your image is really import to obtain a perfect resolution and aspect ratio for your display view.
- The paid professional option would be to use adobe photoshop. This product is a tried and tested software holding the title in the graphic design industry and rightfully so with good reason. This software boasts the most extensive set of features, however, please note that to use such software you will most definitely need training. This software is not a software you will be able to simply pick up and start using, you going to have to hone in your skills and developer the perfect skillset and workflow for this software. Canva is a far more simple approach for any novice user that is just getting started. If you plan on starting web design as your career then we recommend photoshop for optimized workflow and features that Canva just cannot offer.
- Free Image Resources:
If you not creating your own images then you would more than likely hire a professional photographer or graphics artist, alternatively, you could use free images from websites that offer creative commons licenses. Here are a few of the best free image websites.
- https://www.freepik.com
- https://pixabay.com
- https://www.pexels.com
- https://www.rawpixel.com
- https://www.pxfuel.com
- https://pxhere.com
- https://www.flaticon.com
- https://pngtree.com
- https://www.vecteezy.com
- https://creativecommons.org
- https://www.google.com
Google Images most definitely should be mentioned as possibly the largest image archive in the world, so google should be mentioned however not without caution and direction. Google scrapes images from every website in the world made available to its crawlers, once the crawler places your image in google image SERPs you can find the image using googles servers. This should be cautioned because not every image on google images license is creative commons, we, therefore, use the advanced search feature that will allow you to search for creative commons images only.
- Motion Graphics:
Using motion graphics in your content is vital today especially with google rich snippets picking up the meta tags on your website, most web developers make use of hosted video sites to benefit from RTMP servers allowing a true streaming experience. Uploading your videos to your own website will not allow for RTMP streaming and thus slowing down your page load speed and user experience. We highly recommend using Youtube as it gives you a solid RTMP stream with the best user experience possible. Although some users might like Vimeo, although Vimeo is not a free option whilst youtube is completely free to use.
Alternatively, you can easily download videos from third party sites and upload them to youtube to use on your website, some third party loyalty free websites include the following.
- https://allthefreestock.com
- https://www.videezy.com
- https://www.videvo.net
- https://coverr.co
- https://www.pexels.com
- IDE Integrated Development Environment:
An integrated development environment is definitely not a requirement or prerequisite for learning web design with Wishflip, however, if you would like to take your skill to the next level and start learning CSS and HTML then we suggest using microsoft visual studio or adobe dreamweaver as the most preferred solution for advanced web developers.
3. Mapping Your Domain
This is possibly the most asked question, it’s also the first asked question users might have when starting to configure their website. Our advice is to not map your domain right away during the staging of your website. We suggest mapping your domain to your website only once you are ready to go live on your production site.
Before you can map a domain you need to choose an available domain from a domain registrar, Wishflip strongly suggests using Namecheap to register your domain name. For the rest of the article, we will be teaching you to map the domain using Namecheap. However, the same methodology applies to almost all domain registrars.
- What is mapping your domain?
A domain name is a link or URL like wishflip.com that identifies your server by a name that’s human-readable, simple to remember and brand-able. The truth is that computers don’t think like humans and networking servers is an extremely in-depth topic we will save for another day, right now our intention is to help you understand how a domain name works and what’s the use of it using Wishflip’s domain mapping feature.
A server has an IP address, this IP address is added to your domain name DNS registrar as an A Record, so when someone types your website domain in the address bar in their google chrome browser the request is sent to the domain registrar DNS records and then referenced to see what Server IP address the domain is mapped to, then if the domain is valid and the request can reach your server the website will load successfully.
You have to also set a Canonical name CNAME record in your domain registrar DNS settings, this will be added in the same place where you’re A record was set previously. Only once the A record and CNAME record and defined in the domain DNS settings will your website successfully load in theory.
- How Do We Map the Domain on Namecheap?
On your Namecheap account, create a domain for your subdomain you registered with Wishflip. When you registered with Wishflip you choose a name “example.wishflip.com”, this name that replaces the word example is your subdomain.
Here are tutorials from Namecheap to assist you:
The Process on Namecheap Website:
- Sign in to your Namecheap account.
- Select Domain List from the left side menu.
- Click the Manage button next to your domain.
- Navigate to the Advanced DNS tab.
- Click the Add New Record button in the Host Records section.
- Select CNAME Record from the drop-down menu.
- N.B Delete Every Other Record besides the one you just created
Follow this setup:
Replace the word “example” with your subdomain that you registered with Wishflip when creating an account or registering a new website with Wishflip.
Type: CNAME Record
Host: @
Value: example.wishflip.com
TTL: 1 min
Create a second CNAME record this time with the Host being an asterisk sign like this *
Type: CNAME Record
Host: *
Value: example.wishflip.com
TTL: 1 min
The following step is to create the A record using the same method for creating the CNAME record above, the only difference is in step 6 you will select A record instead of CNAME.
Follow this setup:
When creating an A Record you will need the Server IP address, please use the IP address 46.101.106.0
Type: A Record
Host: @
Value: 46.101.106.0
TTL: 1 min
Create a second A record this time with the Host being an asterisk sign like this *
Type: A Record
Host: *
Value: 46.101.106.0
TTL: 1 min
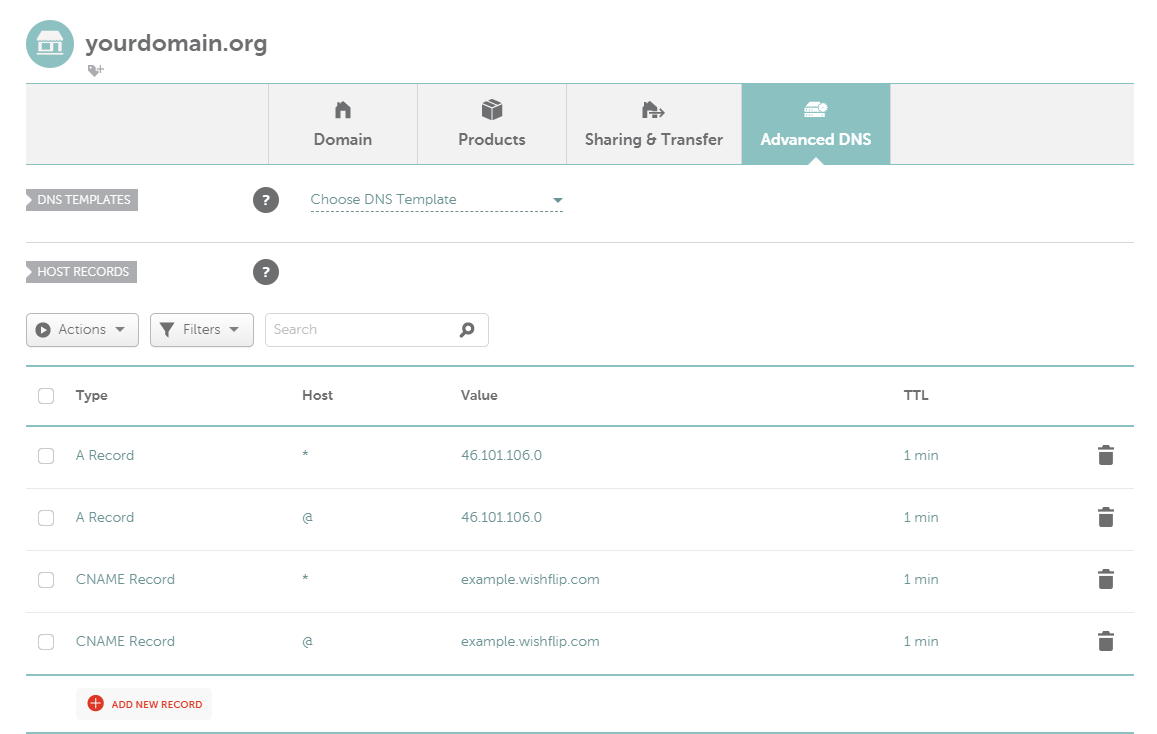
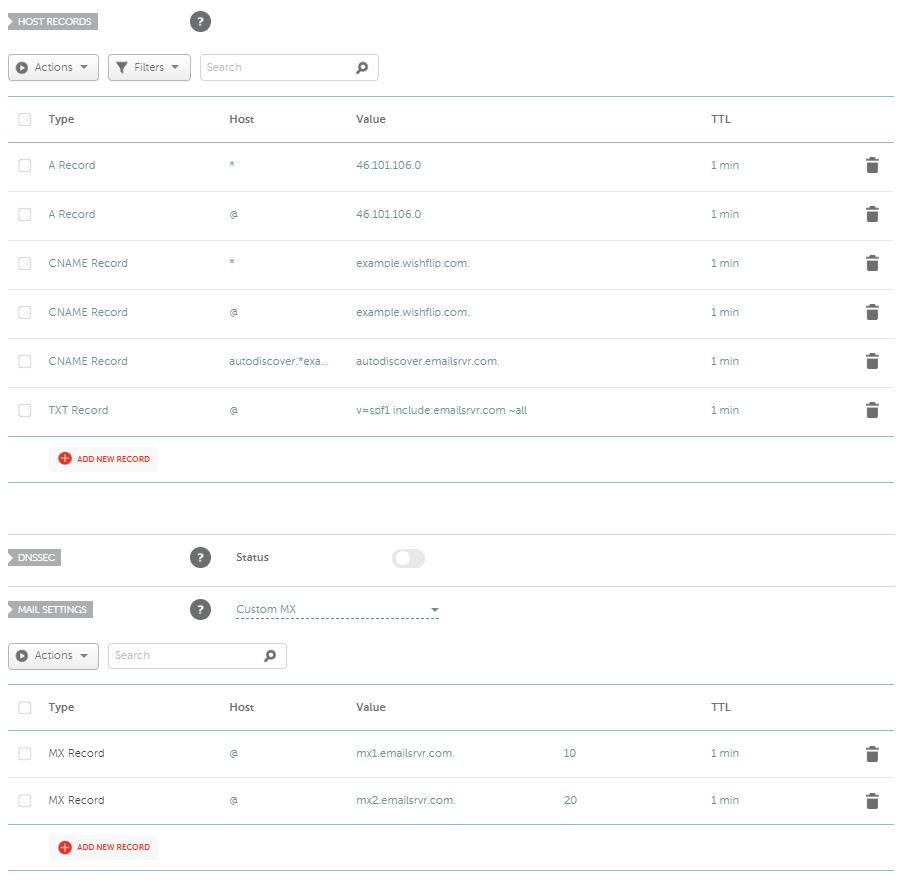
Once you have completed the above steps successfully your domain DNS settings should look like this image below, the only difference would be that the word “example” is replaced with your subdomain name registered when creating a Wishflip Website.
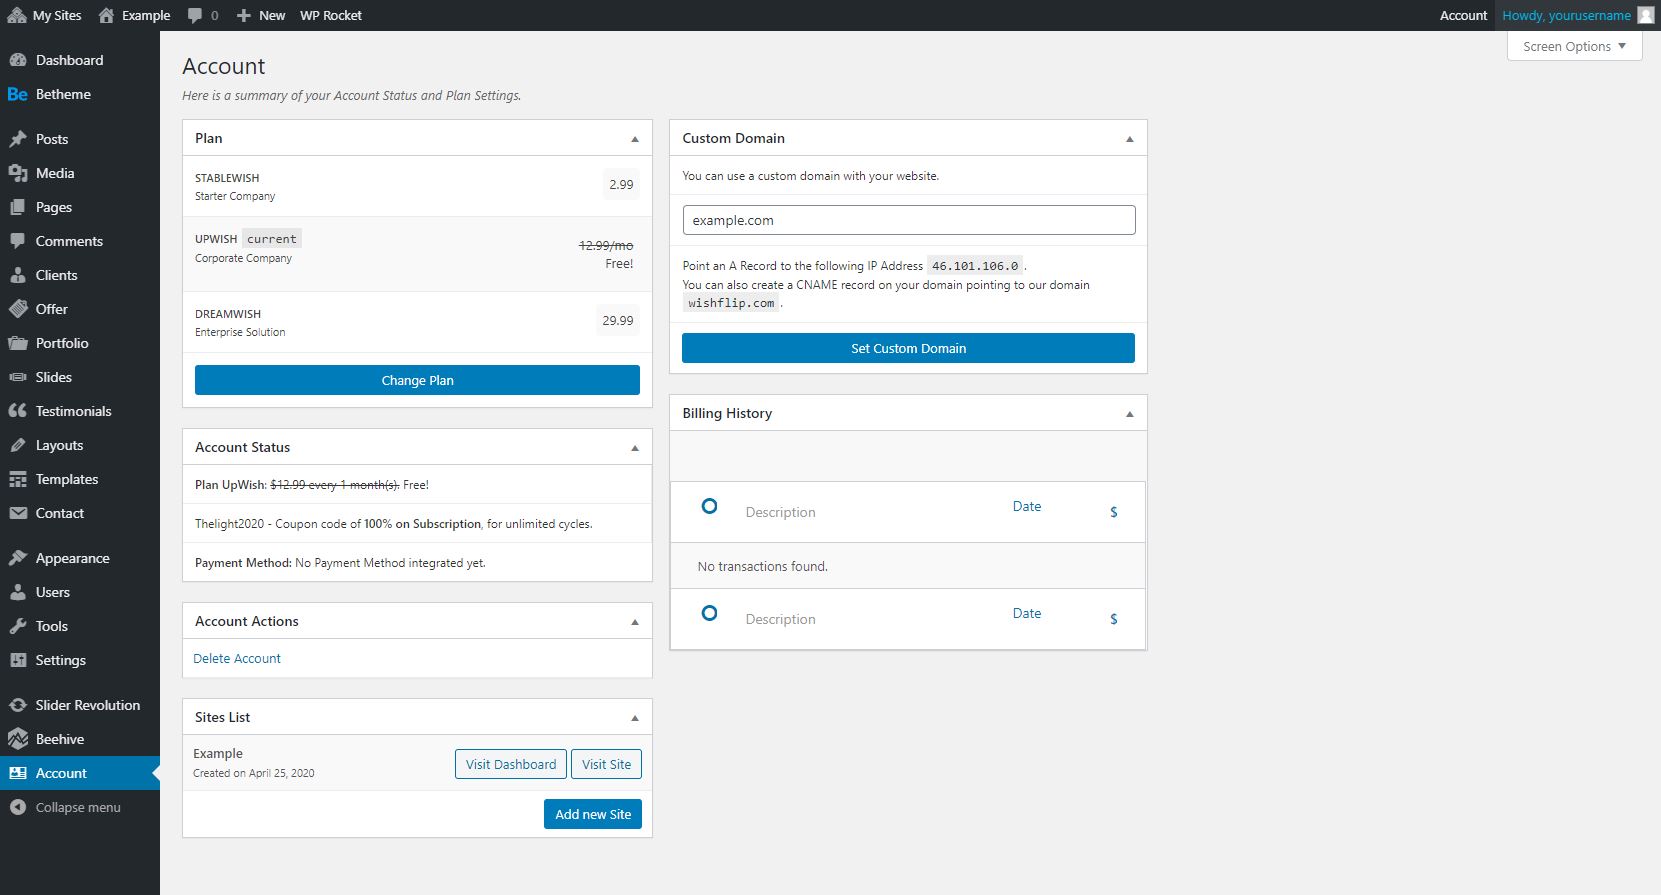
Now that you have successfully configured your DNS settings it is time to actually map your domain name to your Wishflip website. Simply log in to your website and navigate to your account page on the back office of your website and type in the domain name you registered with Namecheap, in our article we used example.com
Important:
You may be aware of this already when you map a domain name you would need to wait a maximum of about 48 hours before the domain DNS changes have propagated to all ISP cache servers and updated the server IP and CNAME record. In some cases we find that the domain mapping takes effect in just minutes, however, in some cases we have waited over 32 hours for a domain to propagate. Our best advice to ensure the propagation takes the shortest time possible is to register a domain and make the DNS changes immediately after you have purchased the domain, this way all ISPs will cache the new server IP address and CNAME record before caching the domain registrars default DNS settings. The setting you see in your DNS settings called TTL, this stands for Time To Live or the time it takes for the DNS settings to change, the shorter this value is the faster the DNS changes will take effect.
Another very important aspect of registering a domain name is the SEO value of the domain, this section should be placed in the SEO tools section of this post, however, it is rather important for a user to first understand this whilst they are in the process of registering their domain name. A domain name is a word, this word is relevant to your product, service, brand or individual. Therefore choosing your domain name is extremely important so that when users or clients search your name in google they find your domain easily. Google will try to match a domain name, to the website name and meta description and meta title of the search term a user googles. To accurately achieve branding your business correctly we highly suggest first finding a domain name for your business and then making sure you have reserved the domain name for your brand by purchasing the domain name, only once you have completed this step we advise that you start branding your company and defining your brand identity or brand ethos. We have certainly seen many clients disappointed to find that their brand name has already been registered by another company, they would then have to find a substitute domain name or less appealing name unrelated to their brand which offers absolutely no SEO search engine optimization value what so ever.
4. Setting up Email
Setting up email is rather simple, you can use any email host you prefer however our recommendation is to use Rackspace as the leading email service provider in the industry. Choosing the best email provider is so important because you want every email to land in your client’s email box successfully. Keeping out of a users spam email box is paramount for your business and by far the most overlooked aspect when clients choose an email service provider. Rackspace makes sure your emails avoid spam boxes at all costs, they also give you a generous amount of space for each example box.
- Signup For an Email Address:
Please note before you signup for an email address below please note that you must own the domain that you register the email address for, so in our example, if you own the domain “www.xyz.com” then you can register any email related to xyz.com like example@xyz.com or john@xyz.com, but you can not register john@abc.com if you do not own the domain “www.abc.com”. To ensure accuracy a Wishflip engineer will reach out to you before finalizing your Email Box Setup.

Rackspace.com is a trusted email hosting service that Wishflip has approved as a reputable service.
Only $2.99 Per Month
25GB Per Email Box
Webmail Access
Virus Protection
Configure your Domain DNS and MX record Settings:
In our examples above we have used namecheap to register your domain name, therefore in this example we will be using namecheap to configure our DNS settings for our domain name. It is important to note that the same methodology or principle we use below would apply to almost all domain registrar DNS settings, the only difference would be where the settings reside on the registrar’s website.
Here are Tutorials from Rackspace Website to Assist you:
- How to setup your domain DNS records
- DNS record definitions
- Outlook hosted email exchange settings
- Setup Autodiscover for outlook
The Process on Namecheap Website:
- Sign in to your Namecheap account.
- Select Domain List from the left side menu.
- Click the Manage button next to your domain.
- Navigate to the Advanced DNS tab.
- Click the Add New Record button in the Host Records section.
- Select CNAME Record from the drop-down menu.
Follow this setup:
Replace the word *example.com* with your domain that you purchased from namecheap between the asterisks for the “host value”. Please leave the value as it is, do not change emailsrvr.com.
Type: CNAME Record
Host: autodiscover.*example.com*
Value: autodiscover.emailsrvr.com
TTL: 1 min
Create a TXT record this time with the Host being an @ sign like you see below in the configuration. Please leave the value as it is, do not change emailsrvr.com.
Type: TXT Record
Host: @
Value: v=spf1 include:emailsrvr.com ~all
TTL: 1 min
The following step is to change your MX records, just below the DNS settings in namecheap is your “mail settings”, once you scroll down to this section you need to change the default from “Email Forwarding” to “Custom MX”, then you will be allowed to enter your custom MX records from Rackspace as seen below.
Follow this setup:
Select Custom MX from the mail settings drop-down option, see below image for reference.
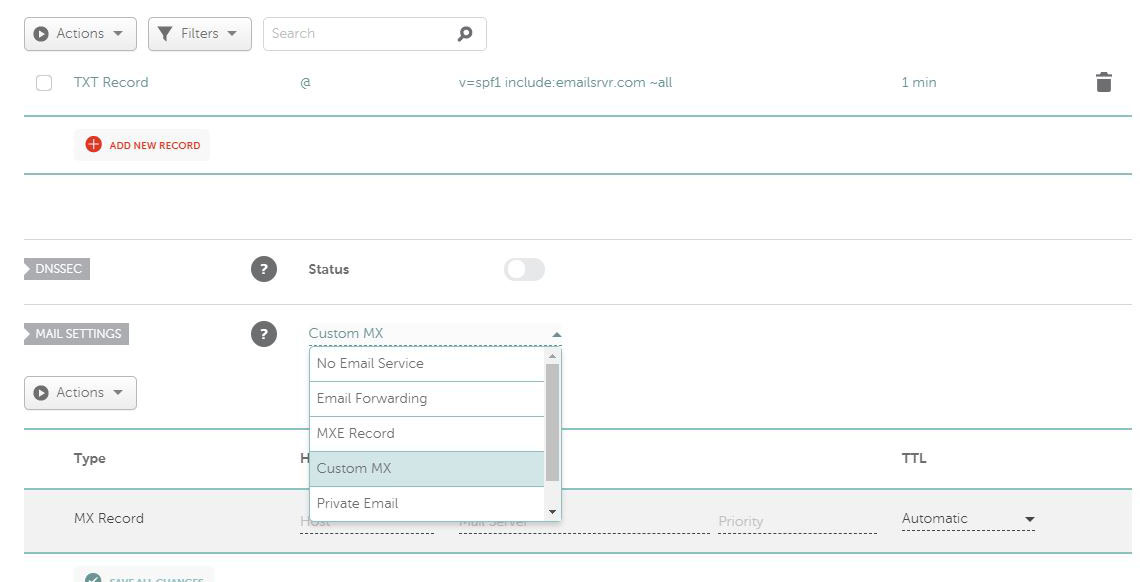
When creating an MX Record you can reference the Rackspace tutorial here or simply add the values below.
Type: MX Record
Host: @
Value: mx1.emailsrvr.com
Priority: 10
TTL: 1 min
Create a second mail server MX record with mx2.emailsrvr.com and priority being 20.
Type: MX Record
Host: @
Value: mx2.emailsrvr.com
Priority: 20
TTL: 1 min
Once all your settings have been completed, your setup should look like this image below just note that your values would change where instructed in our steps above.
6. Basic Website Configuration
- When you have signed up with Wishflip and chosen a template there will be a few default options that need to be changed immediately to make the website specific to your business. Herewith below an exclusive and rather extensive explanation of all the settings you should change right now:
- Your Website Index
I have mentioned this point first for a reason. By default, your website is set to No index so that google robots will not crawl your website or index your website until you have unchecked this box. When you stage your website and begin building the website, all the information will by default and incorrect because the information is based on a standard template from Wishflip. You would not want Google to index this information until you have edited and finalized every page of your website. To change your website index from No index to Index follow the below steps.
- Login to your website back office
- Go to your Dashboard
- In the left-hand side menu click settings
- Now click reading as a submenu
- Locate this setting “Search Engine Visibility”
- Uncheck this box to allow Google to crawl your site
- Click the blue button save changes
- Website Users
By default Wishflip has multiple users already assigned to your website, these users will be either support or demo users, we strongly advise that you remove all demo users and keep just the admin user being yourself. From here on you can add users as and when you require new users, alternatively users can register themselves. It is best you start with am empty user database so that you can validate every new user that registers with your website or that you add to your website.
- Login to your website back office
- Go to your Dashboard
- In the left-hand side menu click users
- Hover over the user you wish to remove
- Click the remove button
- Site Title and Tagline
Your website title and tagline are what your clients or users will see in google search engine results when they search for your business or your brand. Here is how you can edit this for Search engine optimization.
- Login to your website back office
- Go to your Dashboard
- In the left-hand side menu click settings
- Click general in the submenu item of settings
- Locate the value site title and stage line to edit
- Click the blue button save changes
- Ecommerce Website Setup Wizard
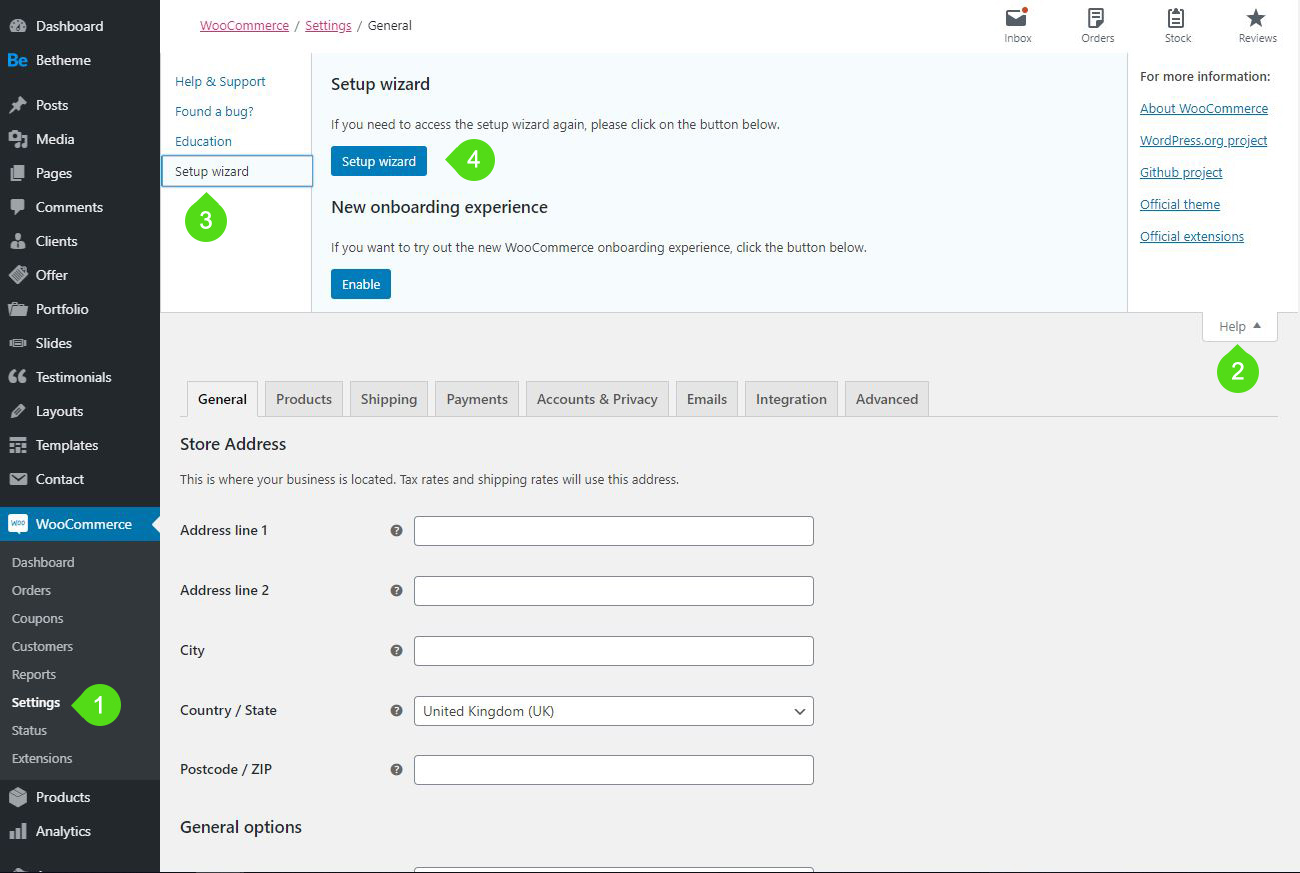
When you create an eCommerce site, you need to run the setup wizard that will guide you through the process of setting up your eCommerce store settings like shipping, currency and multiple other important settings for your eCommerce store to function. Here is the link to set up your store, remember you need to replace example.wishflip.com with your Wishflip website subdomain.
http://example.wishflip.com/wp-admin/index.php?page=wc-setup
Alternatively here is an image below showing you how to find the setup wizard button in your back office. Please do note that a prerequisite for this tutorial is that you have woocommerce eCommerce plugin activated. If this add-on is not activated then the setting will not be available to you.
7. SEO Basic Setup
- Search engine optimization is a word that we have referred to a few times in this post already, not only is SEO important for your website and clients, but it is also a fundamental aspect of your business that clearly defines the success of your business online. Therefore it is worth your time to spend a sufficient amount of time on optimizing your website SEO.
- SEO is a large broad topic, its also a skill that is developed over time, Google is constantly changing the search algorithm and thus what works today might not work next year. For this specific reason, we have decided to keep the SEO setup basic and give you some references to help you better your skills.
- If you are on the DreamWish plan we have some really advanced SEO features that are sure to rank your business in the Google SERPs. However Basic SEO is available on all plans regardless, we know this is fundamental for every website or business.
How Does SEO Work
SEO works with by relating a person’s intent to find something on google, with your website keywords and descriptions. When a person opens their internet web browser like Google Chrome, they open the internet browser for a reason, they usually have intent. Their intent might be to find the cheapest airline tickets from New York to Florida over the summer break or to find a plumber in their area to fix a leaking pipe. The person can not find your website if you have incorrectly optimized your website keywords.
When Google sends crawlers to your website to scrape your website content, Googles Bots will collect every page on your website in a static form and start to match keywords within your website content to users that search queries inside their internet browser. When there is a match between the user’s intended search query and your website keyword then Google will display your website as a result in the search engines.
To rank on page 1 of google for a high ranking keyword is every single business objective when spending time on SEO. So to achieve ranking on the first page of google will take patience, skill and most importantly consistency. To help Google decide which websites are good to rank and which websites are bad to rank Google has developed their own secret algorithm to determine the best results for their users. This what made Larry Page and Google so popular, it was the easiest search engine to use with the most accurate results. So to ensure your website is property ranked and optimized here is what you will need to do.
On-Site Optimization:
- Ensure the Domain name you choose has the keyword that you are targeting, so if you are a drain leak detection company, choose a domain name with your keyword “Leak Detection”. However in most cases, a company has already established a brand and their name might be Johnny Plumbers, in this case, you cannot SEO your domain. Although this is a nice benefit to have for easy readability, its ranking factor is minimum so do not be disappointed if you cannot check this box.
- Adopt a page hierarchy for your page content and post content.
- Ensure that you have pillar content with internal links and external do-follow links
- Create keyword specific page titles and blog posts to help google understand what your website is about.
- Add the correct meta description and meta titles with excerpts to every page
- Create Alt texts for images with relevant keywords
Off-Site Optimization:
- Make sure your signup with Google Analytics to monitor your traffic
- Signup with Google Search Console, AKA Google Webmasters
- Add website and domain property to Google Search Console
- Submit sitemap to Google Search Console
- Verify your website with Google Search Console
- Use Google Tag Manager to manage your website header scripts
- Use Structured Data Testing Tool for Rich Snippets
References and Credible Sources
- Anybody that talks about SEO will talk about these main influential people that help define the best SEO practices to date. Please note that all these SEO tips are purely white hat SEO methods.
- Matt Cutts – used to be the lead SEO specialist at Google, whilst Matt currently works for the NSDS with the federal government. You can read Matt Cutts blog here.
7. Help and Support
Wishflip has a rock solid team of cloud engineers that are ready to take any questions you have or assist with any help you might need. You can contact us here, or use our support line here.




0 Comments